
Boot GCP Compute engine Ubuntu instance in single user mode
How to start a Linux Google Cloud Platform compute instance in single user mode
TLTR – Add “ro single” OR “rw single” OR “rw init=/bin/bash” to the
/etc/default/grub.d/50-cloudimg-settings.cfg file and run “sudo update-grub2″ for the grub changes to take effect and then reboot.
In the cloud, it is very rare to boot a Linux VM in single user mode as it usually requires less effort to launch a new VM with an immutable image or by running a set of recipes or playbooks to configure it on the fly. And if that is not possible, you could attach the virtual disk of the broken system into a healthy instance and debug it from there – say to reset a password.
If all else fails, and some how decide to interact with your GCP instance in single user mode, this blog is for you.
Prerequisites
- Have an account you can login with a password through serial console
- Set “serial-port-enable” to 1 at the instance or project metadata level
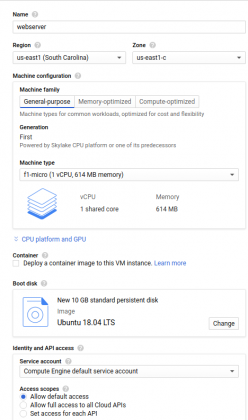
Create a GCP instance (optional)
Below example uses the gcloud cli, you can also do this in the Google cloud console. In below command, gcp project is assumed to be the current project, otherwise use “–project [YOUR_PROJECT_ID]” to specify it. In addition to this, you can modify other settings such as network, subnetwork, zone etc.
Connect to compute instance
We can use ssh or serial console login to modify grub to boot in single user mode.
Once logged in, modify the line “GRUB_CMDLINE_LINUX_DEFAULT” in “/etc/default/grub.d/50-cloudimg-settings.cfg” as below –
Now, you can’t ssh to the instance, as all networking is disabled in single user mode. Connect to the serial console and you should be able to see below message. If you run “runlevel” command, you will get “N 1”.
You are in rescue mode. After logging in, type "journalctl -xb" to view
 system logs, "systemctl reboot" to reboot, "systemctl default" or "exit"
 to boot into default mode.
 Press Enter for maintenance
 (or press Control-D to continue):
 root@webserver:~# runlevel
 N 1
You can fix your system at this point, say to reset your root password or disable a service which prevented the linux box from booting etc. After all the fixes are done, remove the single user flag from grub, run the “update grub2” command and reboot.
References
https://cloud.google.com/compute/docs/instances/interacting-with-serial-console

this only works if you can log into system with a user that can modify the grub conf. But this won’t work if you are locked out of the system. Unless you have modified the grub already after creating a VM so that you can always boot it in single if you need to